Affiliate Disclosure:
If you buy through links on our site, we may earn a small affiliate commission to help support the blog – at no extra cost to you. It never influences our product selection process. Thank you!
Start with basic geometric shapes – Most drawing subjects begin with simple triangles, circles, rectangles, and ovals that serve as the foundation for more complex artwork, making drawing accessible for beginners while building essential skills.
Practice line control and consistency – Focus on developing smooth curved lines, straight line precision, and consistent spacing between elements to create professional-looking drawings that demonstrate technical skill and artistic confidence.
Layer shapes to create depth and dimension – Use overlapping elements, varying line weights, and strategic shading to transform flat geometric sketches into three-dimensional artwork that appears realistic and visually engaging.
Combine geometric precision with organic elements – Master the balance between structured shapes (like rectangles and triangles) and flowing curves (like vines, ribbons, or animal forms) to create dynamic compositions that capture both technical accuracy and natural movement.
Build complexity gradually – Progress from simple single-subject drawings to more elaborate scenes by adding background elements, multiple objects, and storytelling details that enhance your artistic skills while keeping projects manageable and enjoyable.
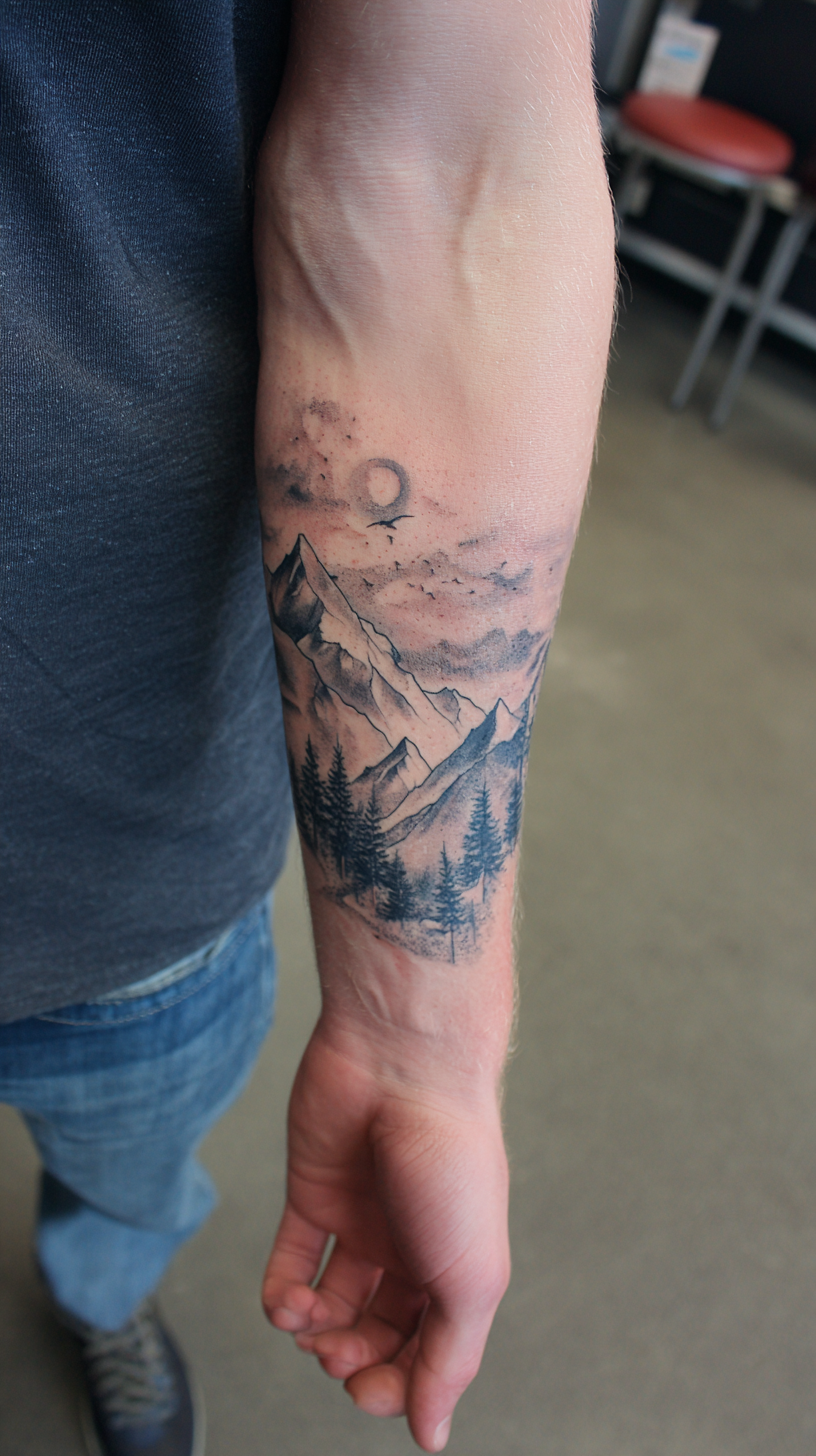
Mountains offer perfect geometric practice for developing your line control and spatial awareness. You’ll start with simple triangular shapes that gradually transform into impressive industry sketches through strategic line placement and directional techniques.
Begin your mountain drawing by sketching basic triangular outlines across your paper’s horizon line. Create varying heights and angles to establish visual interest while keeping the fundamental shapes simple and manageable for your skill level.
Add dimension through geometric line patterns that follow the mountain’s natural slopes and ridges. Draw parallel lines flowing downward from each peak to create depth and texture while maintaining the clean minimalist aesthetic that makes these drawings so appealing.
Layer additional mountain ranges behind your foreground peaks using lighter pressure or different line weights. This technique creates atmospheric perspective and transforms your simple geometric sketch into a compelling industry scene with professional-looking depth.
Consider incorporating this mountain concept into future tattoo designs or home decor pieces once you’ve mastered the basic technique. The geometric approach translates beautifully to various artistic applications while remaining accessible for beginners.
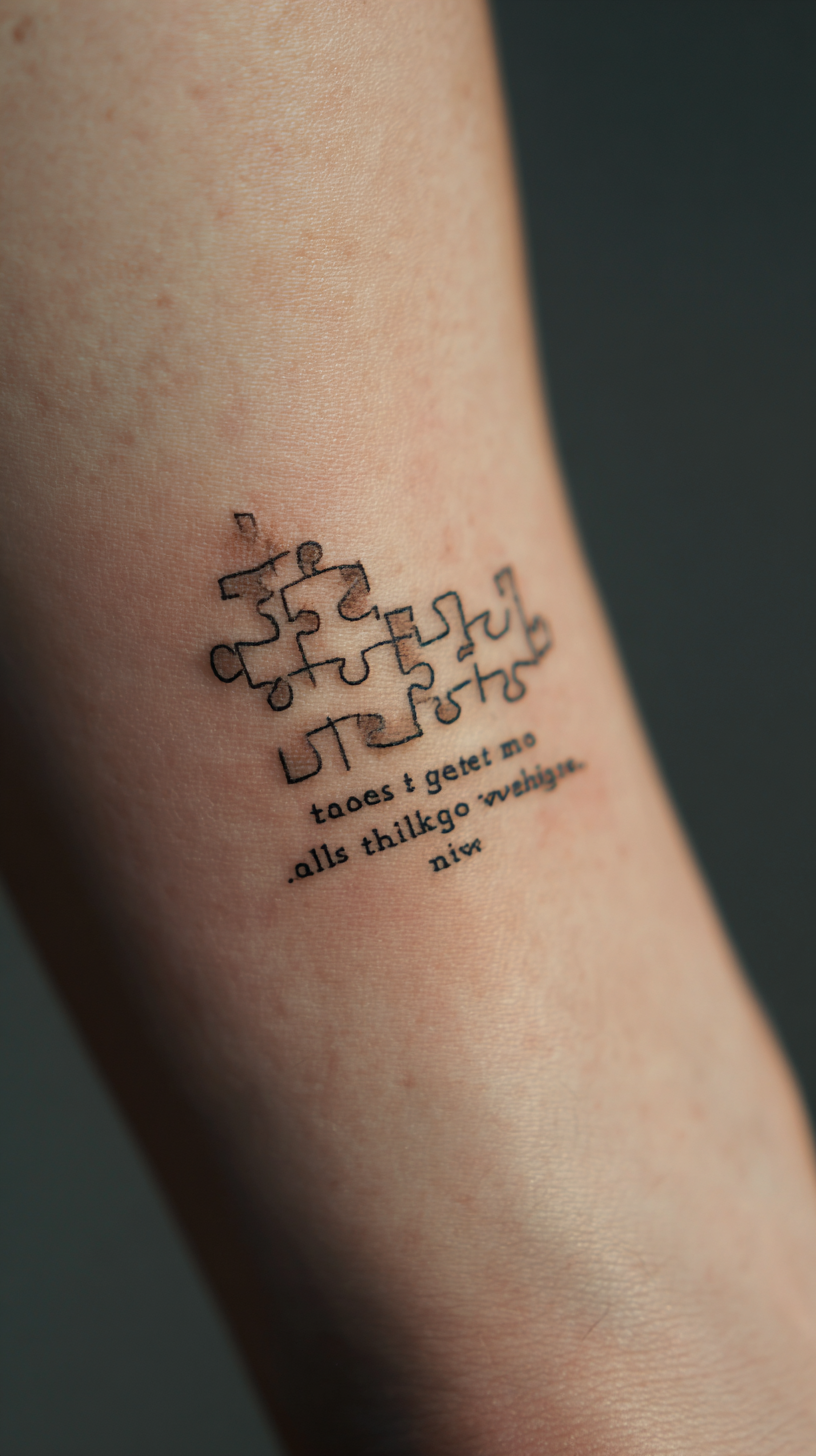
Drawing puzzle pieces offers you a perfect way to practice geometric shapes while creating meaningful artwork. You’ll start by sketching interlocking curved lines and rectangular forms that challenge your precision skills.
Create your puzzle outline using simple rectangular shapes with wavy connecting edges. Add dimensional depth by drawing overlapping pieces that appear to float above or below each other. Include your favorite inspirational quote across multiple puzzle pieces to make the drawing more personal and captivating.
Practice drawing puzzle pieces from different angles to improve your spatial awareness. You can vary the complexity by adding more intricate connecting tabs or creating missing pieces that suggest incompleteness. This technique helps you master curved lines while developing your ability to visualize how separate elements work together as a cohesive whole.
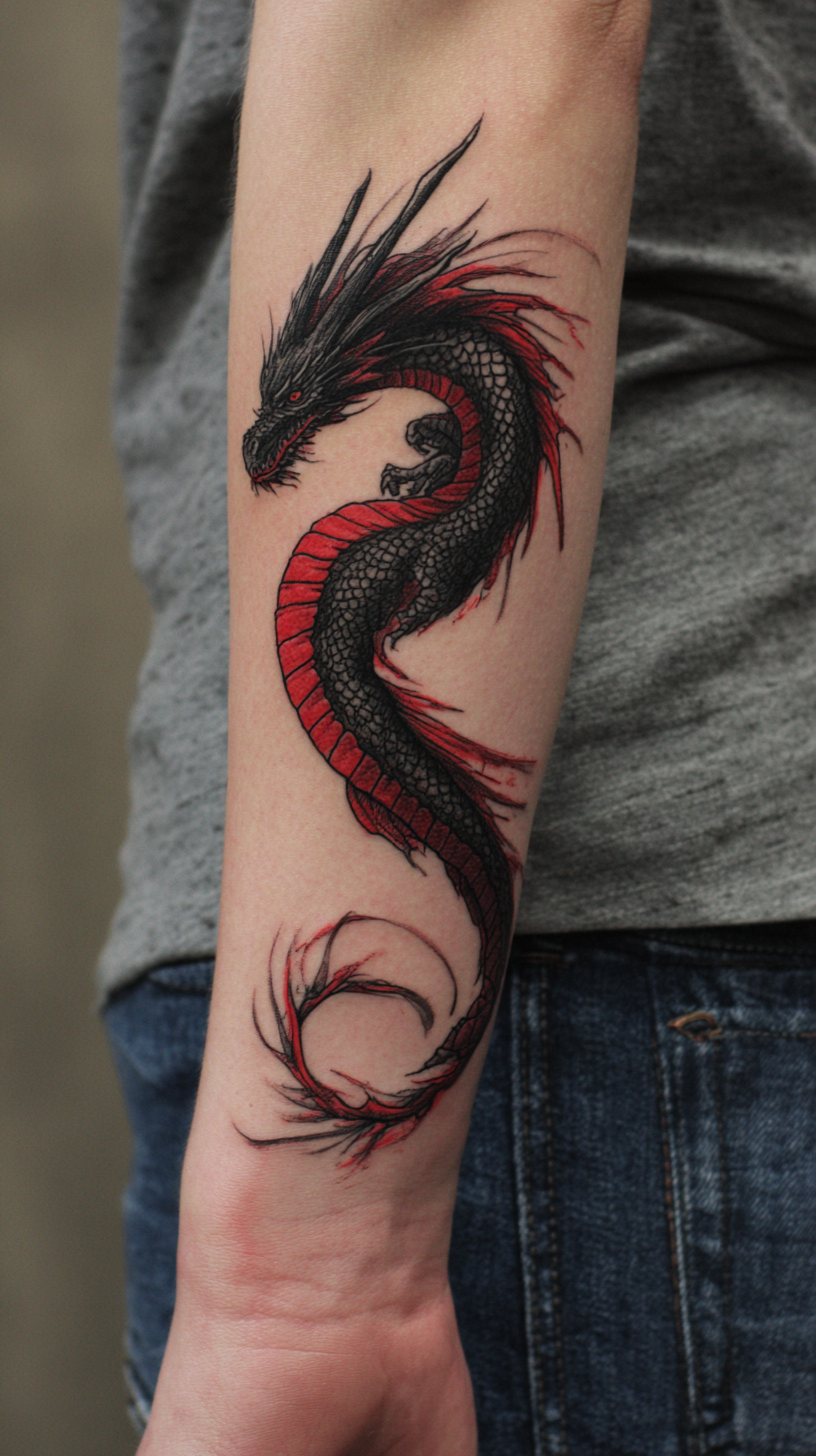
Dragons offer an exciting way to combine basic geometric shapes with fantasy storytelling elements. Start with a simple oval for the body and add a triangular head shape to establish your dragon’s foundation.
Sketch curved lines to create the neck connection between head and body. Draw triangle-shaped wings using angular lines for structure while keeping the wing membranes flowing. Add four cylindrical legs with claw details using short diagonal strokes.
Create the tail by drawing a long curved line that tapers to a point. Include small triangular spikes along the dragon’s back and tail for authentic detailing. Use overlapping circles to form the dragon’s snout and add simple dot eyes.
Practice different dragon poses by adjusting the geometric foundation shapes. You’ll develop confidence drawing mythical creatures while mastering curved lines and proportional relationships between body parts.
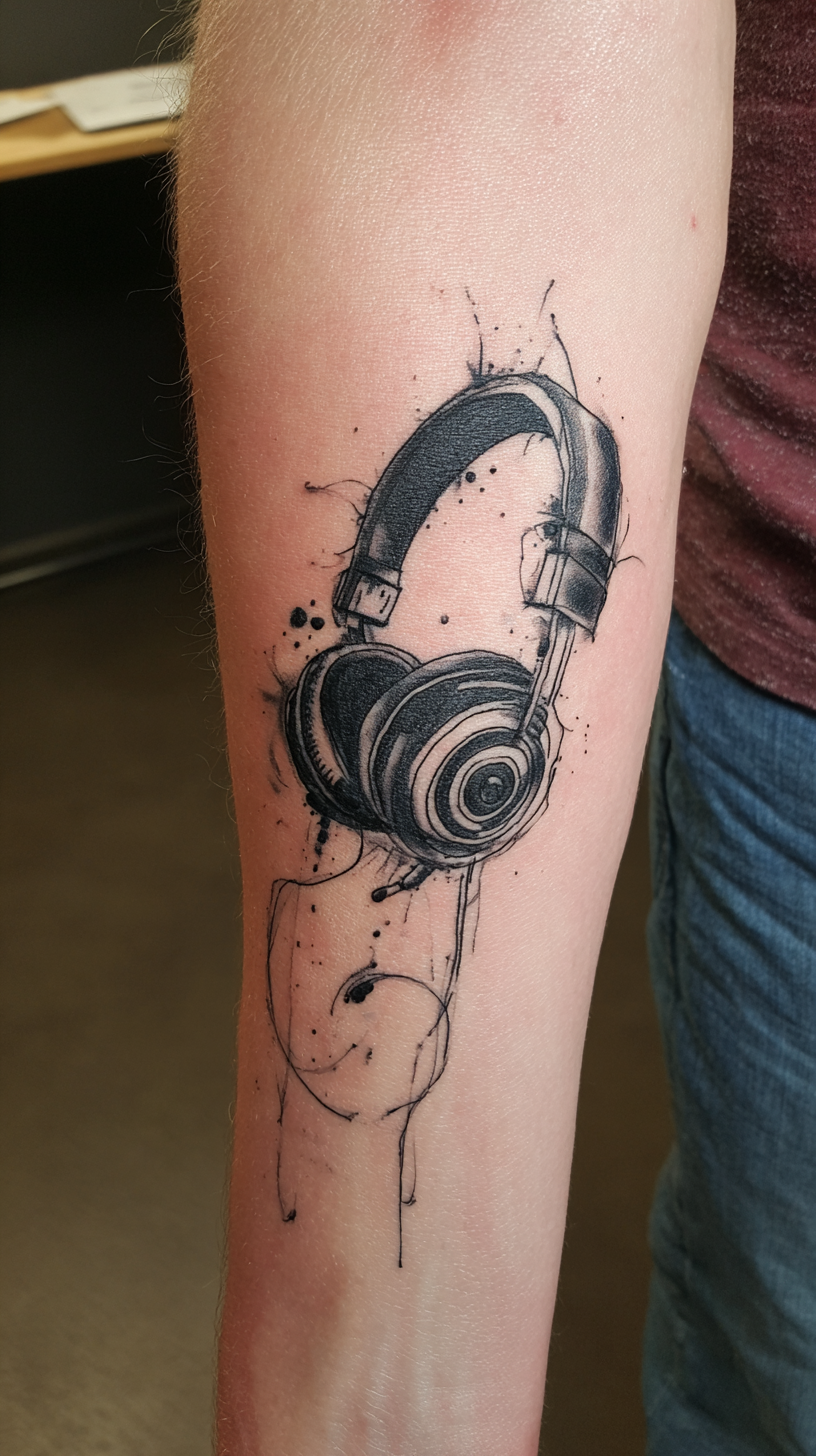
Headphones combine simple geometric shapes with curved lines to create a modern, recognizable object that’s perfect for practicing your drawing fundamentals. You’ll start with two circles for the ear cups and connect them with a curved arc representing the headband.
Begin by sketching two identical circles positioned horizontally across your paper. These circles form the foundation of your headphone ear cups and help you practice consistent shape creation. Add a curved line connecting the top portions of both circles to create the headband structure.
Enhance your headphone drawing by adding rectangular details inside each circle to represent the speaker grilles. You can create geometric patterns within these rectangles using parallel lines or crosshatching techniques. This step helps you practice adding texture and dimension to basic shapes.
Complete your headphones by drawing the connecting wires or adding wireless details like small indicator lights. You’ll find that varying the thickness of your lines creates depth – use thicker lines for the main structure and thinner lines for smaller details like adjustment sliders or brand logos.
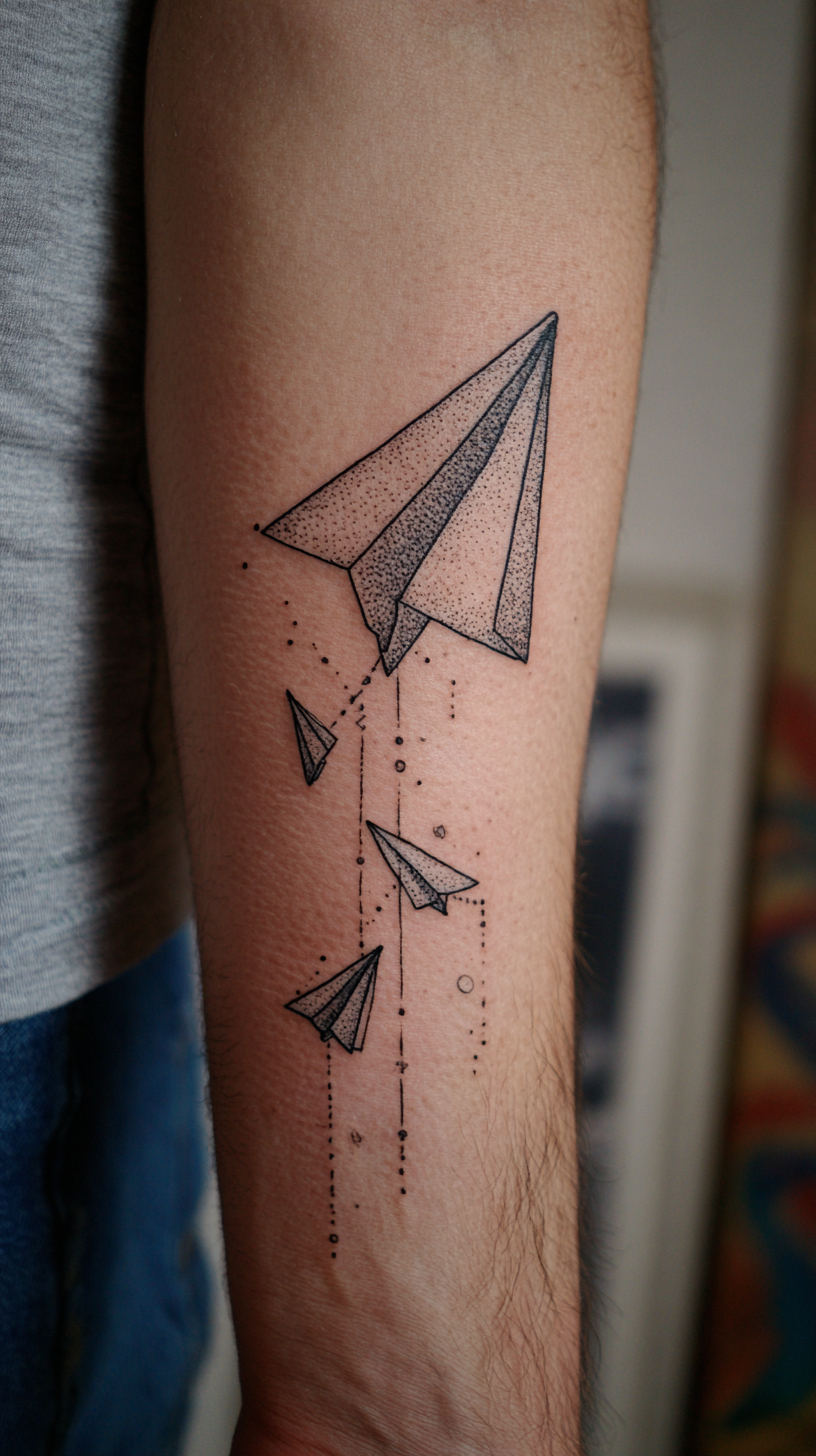
Paper airplanes offer a perfect blend of geometric simplicity and creative storytelling potential. You’ll start by drawing a basic triangle shape for the main body, then add a smaller triangle underneath to create the classic folded paper effect.
Begin with a long, narrow triangle pointing to the right, representing the airplane’s streamlined design. Add diagonal lines within the triangle to show the paper’s fold marks, creating realistic depth and dimension. Draw a smaller triangular section beneath the main body to indicate the bottom fold.
You can enhance your paper airplane drawing by adding motion lines behind it, suggesting flight movement across your page. Try sketching multiple paper airplanes at different angles to practice perspective and spatial relationships.
Consider drawing your paper airplane soaring through clouds, around buildings, or even circling the globe for added visual interest. These simple additions transform a basic geometric sketch into an imaginative scene that tells a story.
Practice varying the airplane’s size and position on your paper to improve your composition skills. You’ll find that this straightforward subject helps develop your understanding of triangular shapes while encouraging creative background elements that make your drawings more captivating and ever-changing.
Pattern drawing transforms simple geometric shapes into mesmerizing designs that’ll strengthen your artistic foundation. You’ll discover how repetitive elements create visual rhythm and help develop your muscle memory for consistent line work.
Start with basic dots arranged in rows across your paper. Space them evenly to create a grid foundation, then experiment with different dot sizes to add visual interest. You can transform these simple circles into flowers, stars, or decorative elements as your confidence grows.
Create zigzag patterns by drawing connected diagonal lines that alternate direction. Begin with gentle angles and gradually make them sharper as you practice. These patterns work perfectly for borders, backgrounds, or standalone artwork that showcases your line control skills.
Draw repeating geometric shapes like diamonds, hexagons, or triangles in organized rows. You’ll notice how these simple forms create complex visual textures when combined. Practice maintaining consistent spacing between elements to achieve professional-looking results.
Experiment with wave patterns by drawing curved lines that flow across your page. Start with gentle undulations and progress to more dramatic curves. These organic patterns contrast beautifully with geometric designs and help you master smooth line creation.
Combine different pattern elements to create unique designs that reflect your artistic voice. You might layer dots over zigzags or weave geometric shapes through flowing lines. This practice builds your understanding of visual composition while keeping your drawing exercises captivating and fun.
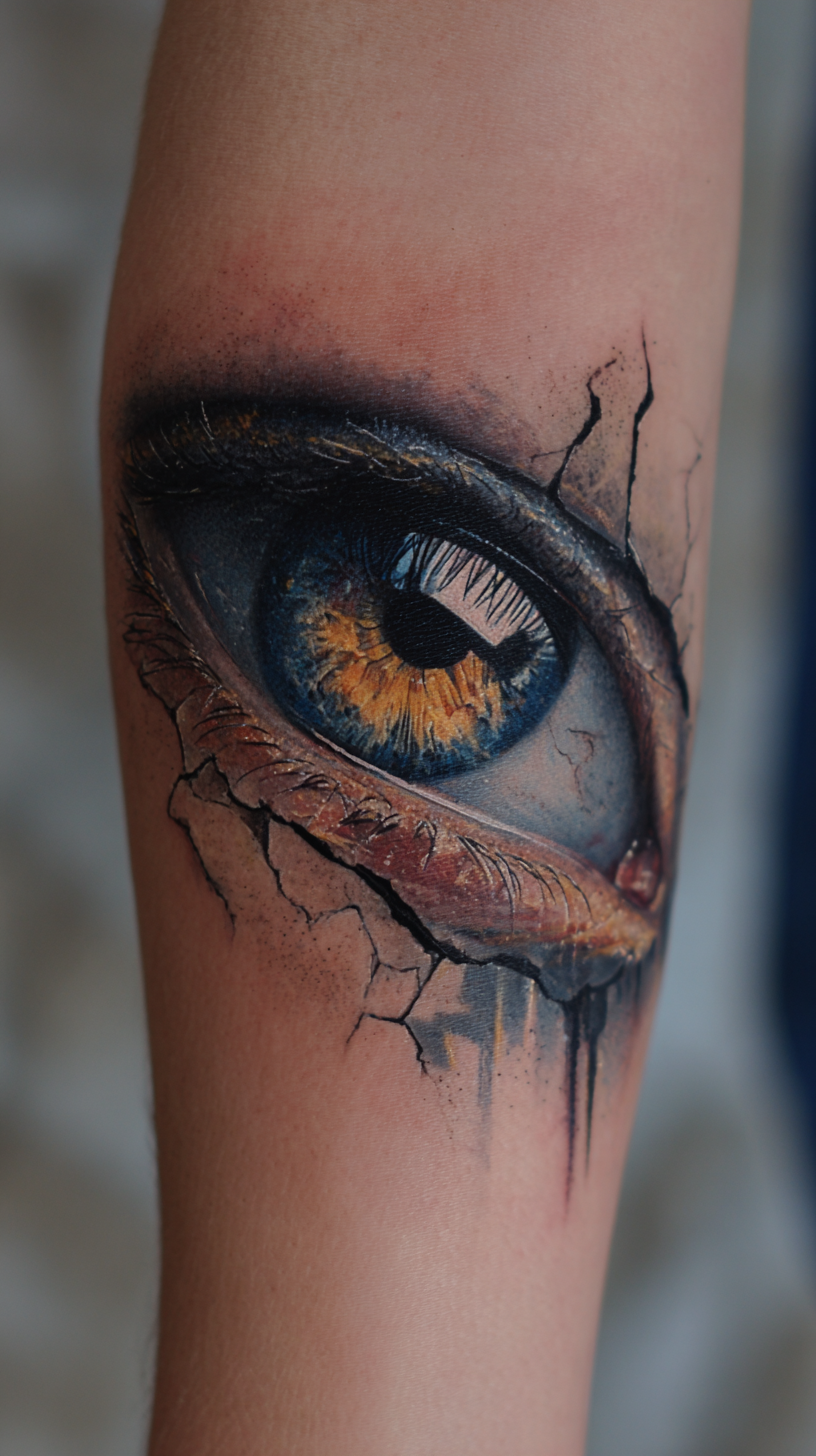
Drawing a realistic eye challenges your observational skills while teaching you fundamental techniques for capturing light, shadow, and proportion. You’ll start by sketching a basic almond shape that forms the eye’s outline, then add a perfect circle for the iris positioned slightly under the upper eyelid to create a natural appearance.
Focus on the pupil next by drawing a smaller dark circle in the iris center, leaving a small white highlight to create that essential reflection. This bright spot brings life to your drawing and prevents the uncanny valley effect that occurs without proper light reflection.
Add depth by shading the iris with radiating lines that flow from the pupil outward, creating the natural texture found in real eyes. You’ll darken the area where the upper eyelid casts shadow on the iris, typically along the top portion.
Draw the upper and lower eyelashes using short, curved strokes that follow the eye’s natural curve. Vary the length and thickness of individual lashes to achieve a realistic appearance rather than uniform lines.
Complete your realistic eye by adding subtle shading around the eye socket and under the lower lid. Practice drawing eyes from different angles and with various expressions to strengthen your portrait drawing foundation.
You’ll create this adorable aesthetic drawing by combining simple shapes with everyday objects that capture modern life perfectly. Start with a rectangular base for the laptop screen and add a smaller rectangle below for the keyboard section.
Draw your cat using basic geometric shapes – begin with an oval for the body and a circular head positioned on top of the laptop. Add triangular ears and use curved lines for the tail that drapes naturally over the laptop’s edge.
You can enhance this drawing by adding simple details like the laptop’s keyboard keys using small rectangles or dots. Practice drawing the cat in different positions – sitting upright, lying down, or stretching across the keyboard for varied compositions.
This subject combines technology with pets, making it relatable and fun to sketch. You’ll develop skills in drawing both geometric objects and organic animal forms while creating a scene that reflects contemporary life.
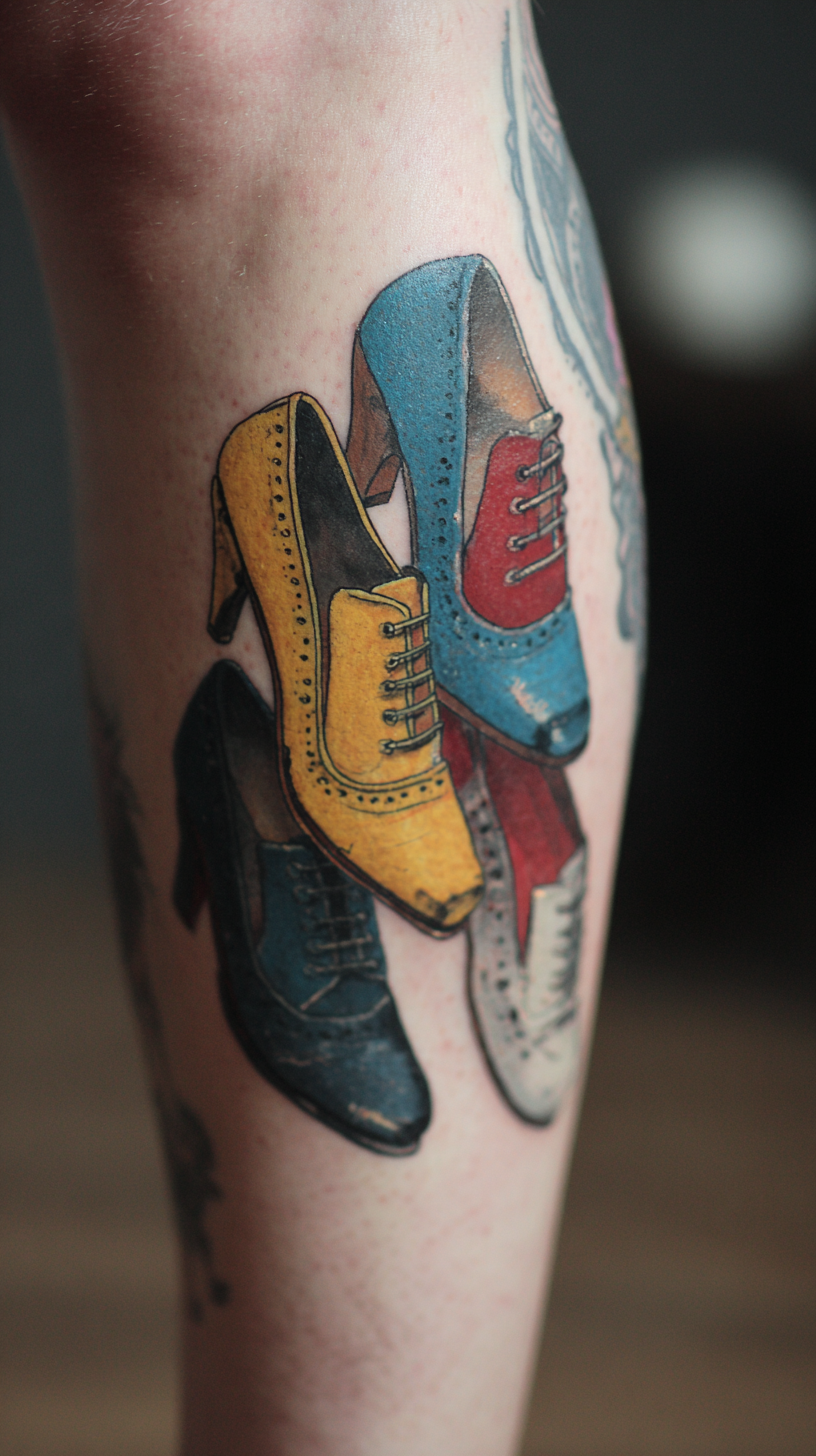
Shoes combine rectangular soles with curved upper sections, making them perfect practice subjects for blending geometric shapes with organic forms. Start by sketching a flat oval or rectangle for the shoe’s base, then add a curved line above it to create the upper portion where your foot would go.
Draw the heel as a small rectangle or triangle attached to the back of the sole, and add laces using simple curved or straight lines across the front. Practice different shoe styles like sneakers, boots, or sandals to explore various geometric combinations and proportions.
Add details like shoelace eyelets using small circles, sole patterns with parallel lines, and texture through cross-hatching or dotted patterns. You can even draw flowers coming out of the shoes for a whimsical touch, combining your geometric shoe foundation with organic floral elements for a creative twist.
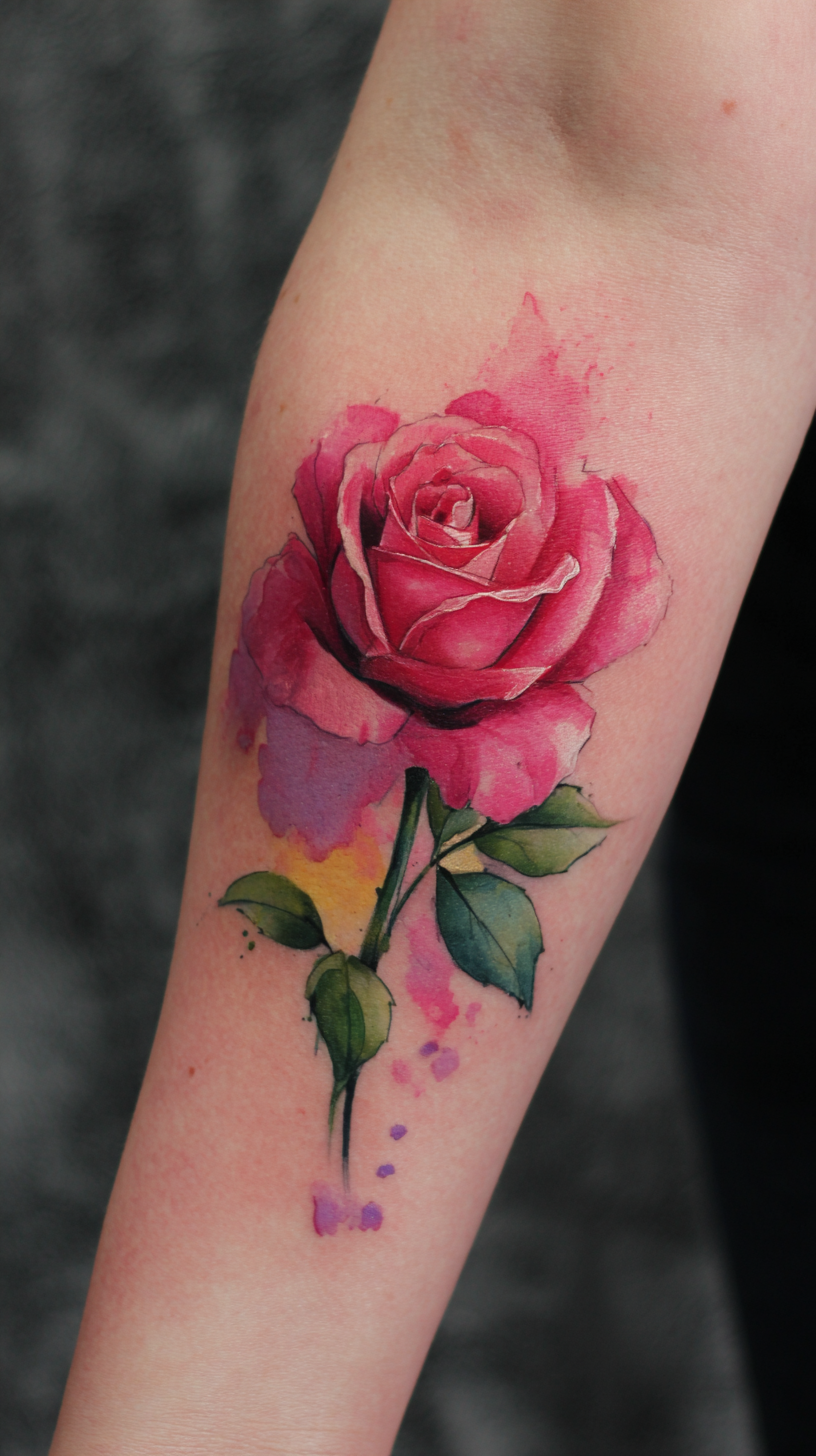
Rose flowers offer perfect practice for combining circular shapes with organic curves while developing your shading techniques. You’ll start with a small spiral at the center and gradually work outward with overlapping curved petals.
Begin by drawing a tight spiral in the center of your rose, then add curved petal shapes around this core. Layer each petal with gentle curves that flow naturally from the center, creating depth through overlapping lines. Practice drawing the outer petals larger and more open than the inner ones.
Add a simple stem using two parallel lines extending downward from the flower base. Include small thorns along the stem with tiny triangular shapes, and finish with a few leaves using basic oval shapes with pointed ends. Shadow the underside of each petal with light shading to create dimension and make your rose appear three-dimensional.
Start with a rectangular shape for the juice box body. Add a smaller rectangle on top for the straw insertion area. Draw a bent straw extending from the top using curved lines and small circles for the bendable sections.
Detail your juice box by adding a triangular peak on top to show the typical folded design. Sketch vertical lines along the sides to represent the box’s creased edges. Add a simple label design on the front face using geometric shapes like circles or rectangles.
Practice drawing juice boxes from different angles to improve your understanding of three-dimensional forms. Try sketching an open juice box with the top flaps spread apart or a crushed box to practice varying geometric proportions and develop your spatial awareness skills.
Cassette tapes blend rectangular shapes with circular elements to create a nostalgic drawing that captures retro charm. Start with a horizontal rectangle for the main body and add two circles inside for the tape reels. Draw small rectangular details for the label area and viewing window to enhance authenticity.
Practice adding geometric patterns within the circles to represent the tape spools. Sketch diagonal lines across the tape reels to show the magnetic tape winding around each spool. You’ll develop your skills in combining straight lines with curved elements while creating a recognizable vintage object.
Enhance your cassette tape drawing by adding small rectangular buttons along the bottom edge. Draw thin horizontal lines across the label area to suggest text or design elements. This exercise strengthens your ability to balance geometric precision with creative details.
Yin yang symbols combine perfect circles with flowing curves, creating a balanced design that teaches symmetry while practicing smooth line control. You’ll start by drawing a complete circle as your foundation, then add an S-shaped curve through the center to divide the space into two interlocking sections.
Steps to Draw:
Create the Outer Circle – Draw a perfect circle using light, confident strokes
Add the S-Curve – Sketch a flowing S-shape from top to bottom, dividing the circle into two equal halves
Draw Inner Circles – Add two small circles within each section for the contrasting dots
Fill and Shade – Color one section dark while leaving the other light, ensuring the small circles remain opposite colors
Practice varying the curve’s flow to understand how subtle changes affect the symbol’s balance and visual harmony.
Fairies combine simple geometric shapes with whimsical details that’ll help you practice drawing magical creatures while developing your skills with both structured forms and organic flowing lines.
Start by sketching a small oval for the fairy’s head and add a larger oval below for the body. Draw stick-like lines for the arms and legs using basic straight lines that connect to small circles for hands and feet.
Add triangular or teardrop-shaped wings extending from the fairy’s back using curved lines that create delicate wing membranes. Practice drawing different wing styles—from butterfly-inspired patterns to more angular geometric designs—to develop your understanding of symmetry and balance.
Enhance your fairy drawing by adding a simple dress using triangular shapes and flowing curved lines for the skirt portion. Draw the fairy’s hair with wavy lines that cascade around the head and add small stars or sparkles using tiny geometric shapes like diamonds and circles surrounding the figure.
15. A Boy and the Universe
Drawing a boy swallowing the universe combines simple human figures with cosmic elements to create imaginative artwork that challenges your creativity. Start by sketching a basic stick figure or simple oval head with a rectangular body. Add curved lines for arms positioned as if the boy’s reaching upward toward his mouth.
Create the universe effect by drawing a large circular shape near the boy’s mouth, filled with smaller circles for planets, dots for stars, and spiral patterns for galaxies. Practice adding shooting stars with diagonal lines and small triangular tails to suggest cosmic movement.
Enhance your drawing by sketching the boy’s hair flowing backward as if pulled by cosmic forces. Add simple geometric shapes like triangles and diamonds scattered around the universe section to represent celestial bodies. This space-themed drawing helps you practice combining human proportions with abstract cosmic patterns while developing your skills in creating ever-changing, storytelling artwork.
16. Moon and Clouds
Moon and clouds combine crescent shapes with fluffy circular forms to create peaceful nighttime scenes. You’ll start by drawing a curved crescent moon with a gentle arc that resembles the letter C. Add simple facial features like closed eyes and a soft smile to give your moon personality.
Create fluffy clouds by sketching several connected circular shapes that overlap naturally. You can draw small raindrops beneath the clouds using teardrop shapes to suggest a gentle shower. Practice varying the cloud sizes from large puffy forms to smaller wisps scattered across your paper.
Enhance your moon drawing by adding subtle shading on the inner curve to create dimension. You’ll develop skills in combining geometric crescents with organic cloud shapes while practicing smooth curved lines. This drawing helps you understand how contrasting shapes work together to create harmonious compositions that capture the serene beauty of nighttime skies.
17. Ribbon Drawing
Ribbons combine flowing curves with dimensional depth to create elegant drawings that help you practice smooth line control and understand how flat surfaces appear three-dimensional. You’ll start by drawing two parallel curved lines that flow gracefully across your paper, creating the ribbon’s basic shape.
Add gentle waves and bends to your parallel lines, making the ribbon appear to twist and turn naturally through space. Practice varying the distance between your lines to show where the ribbon narrows or widens, creating visual interest and movement in your drawing.
Create dimensional depth by adding a curved line that connects the two parallel lines at regular intervals, showing where the ribbon folds or twists. These connecting curves help transform your flat lines into a three-dimensional ribbon that appears to flow through space.
Enhance your ribbon drawing with subtle shading along one edge to emphasize the dimensional quality and make it appear more realistic. Practice drawing ribbons in different positions—flowing horizontally, cascading downward, or forming gentle loops—to strengthen your understanding of how curved forms move through space and interact with light.
18. Life is a Disco Party
Life is a disco party combines circular shapes with radiating lines to create vibrant artwork that celebrates joy and movement. Start by drawing a large circle as your disco ball’s base and add smaller circles across its surface to represent mirror tiles. Draw straight lines extending outward from the center to show light rays bouncing in different directions.
Enhance your disco ball drawing by adding geometric patterns within each mirror segment using small squares or diamonds. Practice drawing the light beams at various angles to create ever-changing energy throughout your composition. Add smaller circular elements around your main disco ball to represent floating musical notes or sparkling effects.
Create depth in your party scene by varying the size of your geometric shapes and overlapping circular elements. Draw rectangular shapes beneath the disco ball to suggest a dance floor and add triangular confetti pieces scattered throughout your artwork. This exercise helps you understand how combining geometric precision with flowing movement creates artwork that captures celebratory energy.
19. Anime Character
Drawing anime characters combines simple geometric shapes with expressive features to help you practice proportional relationships while developing your unique artistic style. Start by sketching a circle for the head and add a smaller curved line underneath for the chin, creating the basic face structure that defines anime character proportions.
Add large oval eyes positioned slightly below the center of the face circle, making them roughly one-third the width of the head. Draw small curved lines for the nose and mouth, keeping facial features minimal since anime focuses more on symbolic expression than realistic detail. Practice varying eye shapes and sizes to create different personalities and emotions in your characters.
Create the hair using flowing curved lines that extend beyond the head circle, adding volume and movement to your character. Sketch triangular or spiky sections for ever-changing hairstyles, or draw smooth waves for gentler personalities. Experiment with different hair textures by varying your line weights and adding geometric patterns within the hair sections.
Draw the body using basic rectangular shapes for the torso and cylindrical forms for arms and legs, maintaining anime’s characteristic proportional style. Add clothing details using simple geometric patterns and flowing lines to suggest fabric movement. Practice drawing your anime character from different angles to strengthen your understanding of three-dimensional forms and improve your overall drawing confidence.
20. Retro PC
Retro PCs combine rectangular shapes with nostalgic tech details to create drawings that celebrate vintage computing while helping you practice geometric precision and proportional relationships.
Start by drawing a large rectangle for the monitor screen and add a smaller rectangle below for the base. Sketch horizontal lines across the screen to suggest scan lines and add a small circle for the power button. Draw another rectangle beside the monitor for the tower unit and include small squares for disk drives.
Practice adding details like a keyboard using connected rectangular keys and enhance your drawing with geometric patterns on the tower’s front panel. Sketch cables connecting different components using curved lines to show how vintage technology integrated multiple parts into a complete system.
21. Heart Flowers
Heart flowers combine the simplicity of heart shapes with organic petal elements to create charming drawings that help you practice curved lines while adding romantic touches to your artwork. You’ll start by sketching a basic heart shape as your flower’s center, using smooth curved lines to form the traditional valentine silhouette.
You can enhance your heart flower by adding five or six teardrop-shaped petals around the heart’s perimeter, connecting each petal to the central heart with gentle curves. Practice varying the petal sizes and angles to create more ever-changing compositions that show depth and movement.
You’ll add a simple stem using two parallel lines extending downward from the heart’s bottom point, then sketch small oval leaves along the stem’s sides. Enhance your drawing with light shading inside the heart center and subtle shadows beneath each petal to create three-dimensional depth.
You can experiment with different arrangements by drawing multiple heart flowers at various heights, creating bouquet-like compositions that strengthen your understanding of spacing and proportion. Practice drawing heart flowers from different angles to improve your skills with curved forms and develop confidence in combining geometric heart shapes with organic floral elements.
22. Cat with Shades
Drawing a cat with sunglasses combines simple geometric shapes with cool personality details to create fun artwork that’s perfect for practicing both circular forms and character expression. You’ll start by sketching an oval for the cat’s head and adding two triangular ears on top.
Create the sunglasses by drawing two connected circles or ovals across the cat’s face, making them slightly larger than typical eye proportions. Add a small rectangular bridge between the lenses and thin lines extending to the sides for the temples.
Enhance your cool cat by adding whiskers using straight lines and a triangular nose below the sunglasses. Practice drawing different sunglass styles like aviators or round frames to develop your skills with various geometric shapes while keeping the drawing playful and captivating.
23. Jar of Luck
Drawing a jar of luck combines cylindrical shapes with whimsical details to create charming artwork that helps you practice geometric forms while adding magical elements to your sketches. Start by sketching a vertical rectangle for the jar’s main body and add a smaller rectangle on top for the lid. Create the jar’s rounded bottom by connecting the rectangle’s lower corners with a gentle curve.
Enhance your luck jar by adding circular coins scattered inside using small circles of varying sizes. Draw four-leaf clovers using heart-shaped petals connected at the center and add horseshoes using curved C-shaped lines. Practice geometric patterns on the jar’s surface to suggest glass texture and add a simple bow or ribbon around the neck using flowing curved lines.
Element
Shape
Detail Level
Jar body
Rectangle + curve
Basic structure
Coins
Small circles
Scattered pattern
Clovers
Heart shapes
Four-petal design
Horseshoes
C-curves
Simple arcs
Consider sketching multiple luck jars at different angles to improve your understanding of cylindrical perspective and practice varying the jar’s contents with different lucky symbols like stars or gems.
24. Cool S Drawing
The Cool S combines angular lines with geometric symmetry to create the iconic symbol that’s perfect for practicing straight-line precision while developing your understanding of interconnected shapes. You’ll start by drawing two parallel vertical lines about an inch apart and add three diagonal lines connecting them at the top, middle, and bottom sections.
Create the signature S-curve by connecting the diagonal lines with additional angled segments that flow naturally from one section to the next. Practice varying the line thickness to add dimension and depth to your Cool S drawing while maintaining the balanced proportions that make this symbol instantly recognizable.
Enhance your Cool S by experimenting with different angles and adding subtle shading along the inner curves to create a three-dimensional appearance. You can also practice drawing multiple Cool S symbols in sequence to improve your consistency with angular geometric forms while developing muscle memory for precise line control.
25. Compass Drawing
Compass drawings combine perfect circles with precise lines to create navigational artwork that helps you practice geometric accuracy while developing steady hand control. Start by sketching a large circle for the compass face and add a smaller circle in the center for the pivot point.
Draw four straight lines extending from the center circle to create the main directional points, ensuring they’re evenly spaced at 90-degree angles. Add triangular arrow shapes at the ends of your lines to represent the compass needle, making the north-pointing arrow slightly larger for traditional compass styling.
Enhance your compass drawing by adding the letters N, S, E, and W at the appropriate directional points. Practice sketching decorative elements around the outer circle’s edge using small triangular or rectangular tick marks to suggest degree measurements.
Compass Element
Shape Used
Practice Focus
Main face
Large circle
Steady curves
Center point
Small circle
Proportion
Direction lines
Straight lines
Precision
Arrow points
Triangles
Symmetry
Draw your compass from different angles to improve perspective skills and understand how circular forms appear three-dimensional. You’ll strengthen your ability to combine geometric precision with functional design elements.
26. Heart Planet
Heart planets combine the familiar heart shape with cosmic circular elements to create whimsical space artwork that’s perfect for practicing curved lines while adding romantic touches to your celestial drawings. You’ll start by sketching a basic heart shape as your planet’s core and enhance it with circular rings around the heart to suggest planetary orbits.
Draw curved lines extending from the heart’s sides to create the planet’s atmospheric glow, and add small circular dots around your heart planet to represent surrounding stars or moons. You can enhance your heart planet drawing by adding geometric patterns within the heart shape to suggest surface features and practicing different ring configurations to develop skills with overlapping circular forms.
Sketch multiple heart planets at various sizes throughout your paper to create an entire romantic galaxy scene, helping you understand how celestial objects interact in space while strengthening your ability to combine organic heart curves with geometric planetary elements.
27. Zombie
Zombies combine simple stick-figure shapes with spooky details to create fun horror artwork that’s perfect for practicing basic human proportions while adding creatively disturbing elements. Start by sketching an oval for the zombie’s head and a rectangular body underneath. Draw stick-like lines for arms and legs, making them slightly bent or crooked to suggest the zombie’s unsteady movement.
Create the zombie’s face by adding two small circles for hollow eyes and a curved line for an open mouth. Enhance your zombie drawing with jagged lines around the clothes to show torn fabric and add small rectangular patches to suggest decay. Practice drawing zombies in different poses – reaching forward with outstretched arms or stumbling with uneven leg positions to capture their characteristic shambling walk.
Draw curved lines extending from the zombie’s body to represent flowing torn clothing, and add small dots around the figure to suggest dirt or decay particles. Sketch multiple zombies at various sizes to create an entire undead scene, helping you understand how horror characters interact while strengthening your ability to combine basic human shapes with creative spooky details.
28. Vine-Covered House
Vine-covered houses combine rectangular architecture with organic flowing elements to create charming drawings that help you practice both geometric precision and natural curved lines. Start by sketching a simple rectangular shape for the house’s main structure and add a triangular roof on top. Draw curved, wavy lines cascading down from the roof and sides to represent the climbing vines covering the building’s surface.
Enhance your vine-covered house by adding small circular shapes along the vine lines to suggest leaves or flowers blooming throughout the greenery. Practice drawing windows and doors as basic rectangles within the house structure, then partially cover them with your vine patterns to show how nature reclaims the building. Add depth by varying your line weights—make the vines closer to you darker and those further away lighter.
29. Things That Make Me Happy
Drawing things that make you happy combines personal reflection with simple geometric shapes to create meaningful artwork that celebrates your individual joy while practicing basic drawing fundamentals. Start by sketching simple circular shapes for objects like coffee cups, donuts, or smiling faces that represent your personal sources of happiness. Add rectangular forms for books, phones, or picture frames that capture your favorite memories and daily pleasures.
Create flowing curved lines to represent activities that bring you joy, such as musical notes for your favorite songs or wavy lines for ocean waves if beach visits make you happy. Draw triangular shapes for ice cream cones, pizza slices, or mountain peaks if hiking adventures fill you with joy. Enhance your happy things drawing by adding small details like steam rising from a coffee cup using gentle curved lines or sparkles around objects using small star shapes.
Practice sketching multiple happy elements across your page to create a personal happiness collage, combining different geometric shapes and organic forms that reflect your unique personality. Vary the sizes of your happy objects to create visual interest and depth, making some items larger to emphasize their importance in your life while keeping others smaller as supporting details.
30. Dog and Cat
Drawing your beloved pets combines simple geometric shapes with expressive details to create heartwarming artwork that captures your furry friends’ unique personalities. Start by sketching an oval for your cat’s head and add two triangular ears on top. Draw a larger oval below for the body and connect them with curved lines for the neck.
Create your dog using similar basic shapes—begin with a circular head and add droopy or pointed ears depending on your pet’s breed. Use rectangular shapes for the body and add four stick-like lines for legs. Practice drawing your cat in various poses like sleeping curled up in a circle or stretching with extended curved lines.
Enhance your pet drawings by adding whiskers with straight lines for cats and a triangular nose for both animals. Draw small circular eyes and add rectangular markings to capture your pet’s unique coat patterns. Practice sketching your dog’s tail as a curved line that shows their happy wagging motion.
Experiment with different angles to improve your skills—draw your pets from the side profile and front view to understand their proportions better. Add simple background elements like a rectangular pet bed or circular food bowl to create complete scenes that tell your pets’ daily stories.
31. Hands
Hands combine curved fingers with rectangular palm shapes to create expressive drawings that help you practice human anatomy while developing skills with both geometric forms and organic proportions. You’ll start by sketching a rectangular or oval shape for the palm’s base and add five elongated oval shapes extending outward for the fingers.
Draw curved lines within each finger to suggest the natural bending joints that make hands appear realistic and dimensional. You can enhance your hand drawing by adding fingernails as small curved lines at each fingertip and practicing different hand positions like pointing, waving, or grasping objects.
Sketch multiple hands at various angles to improve your understanding of how fingers work together and how the palm’s shape changes with different gestures. You’ll strengthen your ability to combine basic geometric shapes with organic human forms while building confidence in figure drawing fundamentals.
32. Airplane Window
Draw a rounded rectangle for the window frame and add a smaller rectangle inside for the glass pane. Sketch horizontal lines across the window to suggest the layered airplane window construction that creates depth.
Add curved lines beyond the window to represent clouds floating past during flight. Draw a horizon line in the distance using a straight line to separate sky from ground, creating the classic airplane passenger view.
Enhance your airplane window drawing by adding wing elements visible from the corner using triangular shapes. Practice shading the window frame darker than the bright sky view to create realistic contrast that captures the experience of looking out during flight.
33. Capybara
Capybaras combine rounded geometric shapes with gentle curves to create adorable drawings that help you practice smooth line control while capturing these peaceful creatures’ calm expressions. Start by sketching a large oval for the capybara’s body and a smaller circle for its head, positioning the head slightly above and in front of the body. Draw four short rectangular legs beneath the oval body, making them sturdy to support the capybara’s robust frame.
Add small circular ears on top of the head and tiny dots for the eyes and nose, keeping the facial features minimal to reflect the capybara’s serene nature. Create the capybara’s distinctive rounded snout by extending a gentle curve from the head circle, and add a small line for the mouth. Enhance your capybara drawing by sketching simple grass lines around its feet and practicing different resting positions, such as sitting or lying down, to capture their relaxed lifestyle and strengthen your ability to combine circular body shapes with rectangular supporting elements.
34. Record Player
Record players combine circular shapes with rectangular elements to create nostalgic drawings that capture vintage music charm while helping you practice geometric precision and proportional relationships. Start by sketching a large circle for the turntable platter and add a smaller circle in the center for the spindle. Draw a rectangular base beneath the circular turntable to create the record player’s foundation, making it slightly wider than the circle above.
Enhance your record player drawing by adding a curved tone arm extending from the right side of the base, using a thin line that ends with a small triangular cartridge. Practice drawing horizontal lines across the rectangular base to suggest control panels and add small circular knobs for volume and tone controls. Sketch concentric circles on the turntable to represent the record’s grooves, varying the spacing to create realistic texture.
You can strengthen your drawing by practicing different angles to improve perspective skills and adding geometric patterns around the base’s edges to suggest speaker grilles or decorative elements. Try sketching vinyl records leaning against the player using simple circular shapes with rectangular album covers to create a complete retro music scene.
35. Shark
Sharks combine streamlined triangular shapes with curved fins to create powerful marine predators that help you practice both geometric precision and flowing organic lines. Start by sketching an elongated oval for the shark’s main body and add a triangular head at one end to create the classic torpedo shape. Draw a curved triangular dorsal fin on top of the body and add two smaller triangular pectoral fins extending from the sides.
Enhance your shark drawing by adding a crescent-shaped tail fin at the back and sketching a curved line underneath for the belly. Draw simple triangular teeth along the jaw line and add a small circular eye near the head’s front. Practice drawing sharks from different angles to improve your understanding of how their streamlined bodies cut through water, and experiment with adding motion lines behind the shark to suggest swift movement through the ocean depths.
36. Whale with Balloons
Whale with balloons combines gentle curves with circular shapes to create whimsical artwork that helps you practice both organic marine forms and geometric balloon elements. You’ll start by sketching a large oval for the whale’s body, making it slightly curved to capture that characteristic rounded whale shape. Add a smaller curved triangle at one end for the tail flukes, ensuring they’re positioned horizontally to show the whale’s natural swimming orientation.
Draw your whale’s head by extending the front of the oval into a slightly rounded point, then add a small curved line for the mouth to give it a friendly expression. Create the balloons by sketching several circles of varying sizes above the whale, connecting each one to the whale’s back with thin curved lines to represent balloon strings.
Enhance your whale with balloons drawing by adding a small circular eye and perhaps a tiny spout of water emerging from the whale’s blowhole. Practice drawing the balloons at different heights and angles to create visual depth and movement in your composition. You can experiment with adding patterns inside the balloons or varying their sizes to create a more ever-changing floating effect that suggests the whale’s magical journey through the sky.
37. Blue Butterflies
Blue butterflies combine elegant wing shapes with vibrant color practice to create stunning artwork that helps you master symmetrical drawing while exploring nature’s most beautiful color palettes. You’ll start by sketching two large oval or teardrop shapes for the main wings, positioning them horizontally to create that classic butterfly wingspan. Draw two smaller wing shapes below the main wings, making them slightly more triangular to capture the authentic butterfly proportions.
You can enhance your blue butterfly drawing by adding a thin vertical line between the wings for the body and two curved lines extending from the head area for delicate antennae. Practice creating wing patterns using small circles, dots, and curved lines across the wing surfaces to represent the intricate designs found on real blue butterfly species. Experiment with different shades of blue throughout your butterfly, from deep navy edges to lighter sky blue centers, helping you understand how color gradients create depth and dimension in your artwork.
You’ll strengthen your symmetry skills by ensuring both sides of your butterfly match perfectly, practicing consistent curved lines that flow naturally from wing to wing while maintaining that graceful flutter effect that makes butterflies so captivating to draw.
38. Polaroid Drawing
Polaroid drawing combines rectangular photography frames with nostalgic instant camera charm to create vintage artwork that helps you practice geometric precision while capturing memories in artistic form. You’ll start by sketching a large square for the main photo area and add a slightly wider rectangular border around it to create that classic Polaroid frame shape. Draw a smaller rectangle below the square photo area to represent the white border where people traditionally wrote captions or dates.
Enhance your Polaroid drawing by adding curved corners to soften the rectangular edges and make them appear more authentic to real instant photos. You can sketch simple scenes inside the photo square—perhaps mountains, flowers, or faces—to practice combining geometric frames with organic subjects. Practice drawing multiple Polaroids scattered across your paper at different angles to improve your understanding of perspective and create ever-changing compositions.
Add realistic details like a thin shadow beneath each Polaroid to suggest they’re lying flat on a surface, and experiment with drawing handwritten text in the white border area using simple curved lines. You’ll strengthen your ability to balance structured geometric forms with creative storytelling elements while developing skills that translate perfectly to other framed artwork and perspective drawing exercises.
39. Balloon
Balloons combine simple circular shapes with flowing string elements to create cheerful drawings that help you practice smooth curves while adding celebratory touches to your artwork. Start by sketching a large oval or teardrop shape for the balloon’s main body, making it slightly wider at the top and narrower toward the bottom to capture that authentic inflated appearance.
Draw a small triangular knot at the balloon’s base where the string would be tied, connecting it with a thin curved line that extends downward to represent the string. You can make the string wavy or straight depending on whether you want to show movement or a calm floating balloon.
Enhance your balloon drawing by adding a small highlight circle near the top to suggest the balloon’s shiny surface catching light. Practice drawing multiple balloons at different heights and angles to create an entire celebratory scene, varying their sizes to add visual depth and interest to your composition.
Element
Shape
Enhancement
Main body
Large oval/teardrop
Highlight circle for shine
Knot
Small triangle
Connected to string base
String
Curved line
Wavy for movement effect
Multiple balloons
Varying sizes
Different heights for depth
Sketch balloon clusters by drawing several balloons close together with their strings converging at one point, strengthening your ability to combine circular forms with linear elements while creating drawings that capture joy and celebration.
40. Gameboy
Gamebys combine rectangular shapes with nostalgic gaming charm to create retro artwork that helps you practice geometric precision while celebrating classic handheld gaming culture. Start by sketching a tall vertical rectangle for the Gameboy’s main body, making it roughly twice as tall as it’s wide to capture that authentic handheld gaming device proportion.
Draw a smaller horizontal rectangle near the top third of the main body to represent the screen area. Add four small circles below the screen – two on the left arranged vertically for directional controls and two on the right positioned diagonally for the A and B buttons. Sketch a horizontal rectangular shape below these buttons for the speaker grille, using parallel lines to suggest the classic grid pattern.
Enhance your Gameboy drawing by adding small rectangular details around the edges to represent the device’s classic button placement and ports. Practice drawing the screen with simple geometric patterns inside to suggest a game display, such as basic pixel-art characters or simple maze patterns. Add subtle shading around the button areas to create depth and dimension that makes your drawing appear more three-dimensional.
Experiment with drawing different Gameboy colors by varying your shading techniques, and practice sketching the device from slight angles to improve your understanding of how rectangular electronic forms appear in perspective.
Ubaldo Ramirez
Hello, I am Ubaldo Ramirez, the owner of Controversy Ink Tattoo Studio. At our studio, tattoo art is not just a profession; it is a passion and limitless creativity. With many years of experience in the industry, I and my talented team of artists are committed to bringing you unique works of art that reflect your personality and personal story.